Plug It In!
Your picoAUDIO board has been specially designed to work with the TinyPICO ESP32 development board. The convenient headers provide an easy way to connect your boards together without the hassle of jumper wires.
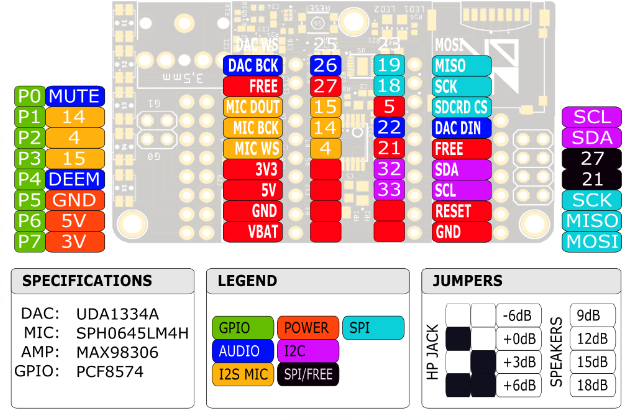
There is nothing stopping you from using any microcontroller with the picoAUDIO board, though you will need to consult the pinout reference and connect them manually.
Handling
When handling the picoAUDIO board, try to avoid unnecessary contact with the jumper pins. Contacting these pins while the board is operating will introduce noise and possibly short circuits forcing the audio amplifiers to perform a protective shutdown. If enough static electricity is discharged it is possible to damage your audio board ICs.
Plastic shrouds and a 3D printed base have been provided to help avoid unwanted contact with the audio gain jumpers.
When attaching the base to the board, use 2.5mm / M2.5 screws, with a preference to using nylon screws to avoid unwanted shorts to nearby components. Ensure you do not overtighten your screws as this may result in crushing the board and damaging the external or internal layers.
Preparation
Before compiling the picoAUDIO example applications, a few simple preparations are required.
First we need to install some open source support libraries for LCD and TFT screens. Even if you don't intend on using a screen with your picoAUDIO device, you will need to download these libraries to compile the MP3 SDCard and MP3 Net Radio samples.
| Library | URL | Used In Samples |
|---|---|---|
| PicoAudio | https://github.com/AdamKeher/Pico-Audio-Arduino | Most |
| TinyPICO-Helper | https://github.com/tinypico/tinypico-arduino | MP3_NetRadio, Sound_Recorder, Vocoder |
| LiquidCrystal_I2C | https://github.com/johnrickman/LiquidCrystal_I2C | MP3_NetRadio, MP3_SDCard |
| TFT_eSPI | https://github.com/Bodmer/TFT_eSPI | MP3_NetRadio |
Make Some Noise
Now that we have installed the required supporting library files for the picoAUDIO board, we can move on to the more interesting task of making NOISE!
LCD Display
Let's keep the momentum going and connect a 16×02 I2C LCD to our picoAUDIO running the MP3 SD Card example.
Specifications
| IC | Manufacturer | Purpose | Datasheet |
|---|---|---|---|
| UDA1334ATS | NXP | I2S DAC | UDA1334ATS.pdf |
| MAX98306 | Maxim | Analog Stereo Amplifier | MAX98306.pdf |
| TPA6132A2 | Texas Instruments | Analog Headphone Amplifier | TPA6132A2.pdf |
| SPH0645LM4H | Knowles | I2S Microphone | SPH0645LM4H.pdf |
| PCF8574RGTR | Texas Instruments | I2C GPIO Expander | PCF8574.pdf |
Pinout
Audio Samples
The following audio files have been recorded from the picoAUDIO's headphone jack using a Native Instruments DAC connected to a PC. The files have not been processed in any way other than to trim the start and end of the files. They are indicative of the audio quality achieved by the board.
Audio Chain for Demo Recordings
DAC
Headphone Amp
(+8dB)
Stereo Channel Test
A simple test of stereo separation.
Audio Sweep
A full sweep across the audio spectrum showing the picoAUDIO's range and fidelity.
Music Test
A recording of Deadmau5 / Where's The Drop? / Strobe (ov) from a MP3 file played via the SDCard slot.